V2ray + TLS + Nginx setting up VPN
For Learning Purposes Only
Prerequisites
First of all,buy a server,e.g. CentOS / Ubuntu, configure the security groups and close the firewall.
Nginx
添加CentOS 7 Nginx yum资源库:
使用yum从Nginx源服务器中获取来安装Nginx:
rpm -Uvh http://nginx.org/packages/centos/7/noarch/RPMS/nginx-release-centos-7-0.el7.ngx.noarch.rpm安装 Nginx
yum install -y nginx启动 Nginx
systemctl start nginx.service如果启动失败,可能是安装 CentOS 时默认安装了 Apache,需要先卸载Apache:
systemctl stop httpd
yum remove -y httpd
开机启动 Nginx:
systemctl enable nginx.service查看 Nginx 配置文件目录:
nginx -t部署网页
申请域名并将SSL证书放置到 /usr/share/nginx/cert/,网页打包好的静态资源文件放到 /usr/share/nginx/html/ 下,附上 Nginx 配置:
# cat /etc/nginx/conf.d/default.conf

server {
    listen       80;
    listen       443 ssl;
    server_name  example.com;

    #access_log  /var/log/nginx/host.access.log  main;

    ssl_certificate     /usr/share/nginx/cert/1_example.com_bundle.crt;
    ssl_certificate_key /usr/share/nginx/cert/2_example.com.key;
    ssl_session_cache   shared:SSL:1m;
    ssl_session_timeout 5m;
    ssl_ciphers         HIGH:!aNULL:!MD5;
    ssl_prefer_server_ciphers  on;

    location / {
        root   /usr/share/nginx/html/;
        index  index.html index.htm;
    }

    # redirect server error pages to the static page /50x.html
    #
    error_page   500 502 503 504  /50x.html;
    location = /50x.html {
        root   /usr/share/nginx/html;
    }

    location /v2ray {
        proxy_redirect off;
        proxy_intercept_errors on;
        error_page 400 = https://example.com/;
        proxy_pass http://127.0.0.1:5055; #假设WebSocket监听端口为5055
        proxy_http_version 1.1;
        proxy_set_header Upgrade $http_upgrade;
        proxy_set_header Connection "upgrade";
        proxy_set_header Host $http_host;
        # 向后端传递访客ip
        proxy_set_header X-Real-IP $remote_addr;
        proxy_set_header X-Forwarded-For $proxy_add_x_forwarded_for;
    }
}
V2Ray
服务端
服务端安装教程参照: https://github.com/v2fly/fhs-install-v2ray
安装后修改配置:
# cat /usr/local/etc/v2ray/config.json

{
    "inbounds": [
        {
            "port": 5055,
	        "listen": "127.0.0.1",
            "protocol": "vmess",
            "settings": {
                "clients": [
                    {
                        "id": "xxxxxxxx-1234-5678-90ab-xxxxxxxxxxxx" #  生成随机 uuid,需和客户端保持一致,
                        "alterId": 64
                    }
                ]
            },
	        "streamSettings": {
                "network": "ws",  //使用WebSocket协议
                "wsSettings": {
                    "path": "/v2ray"  //这里指定的路径一定要与Nginx配置中匹配规则的路径一致
                }
            }
        }
    ],
    "outbounds": [
        {
            "protocol": "freedom"
        }
    ]
}
重启服务端: systemctl restart v2ray。
**注意:**如果在设置完成之后不能成功使用,可能是由于 SElinux 机制 (如果你是 CentOS 7 的用户请特别留意 SElinux 这一机制) 阻止了 Nginx 转发向内网的数据。如果是这样的话,在 V2Ray 的日志里不会有访问信息,在 Nginx 的日志里会出现大量的 “Permission Denied” 字段,要解决这一问题需要在终端下键入以下命令:
setsebool -P httpd_can_network_connect 1
客户端
客户端我使用的是 Qv2ray,安装后配置如下:
{
    "inbounds": [
        {
            "listen": "127.0.0.1",
            "port": 10808,
            "protocol": "socks",
            "settings": {
                "auth": "noauth",
                "ip": "127.0.0.1",
                "udp": true
            }
        }
    ],
    "outbounds": [
        {
            "protocol": "vmess",
            "settings": {
                "vnext": [
                    {
                        "address": "example.com",
                        "port": 443,
                        "users": [
                            {
                                "id": "xxxxxxxx-1234-5678-90ab-xxxxxxxxxxxx",
                                "alterId": 64
                            }
                        ]
                    }
                ]
            },
            "streamSettings": {
                "network": "ws",
                "security": "tls",
                "tlsSettings": {
                    "allowInsecure": false
                },
                "wsSettings": {
                    "path": "/v2ray"
                }
            }
        }
    ]
}
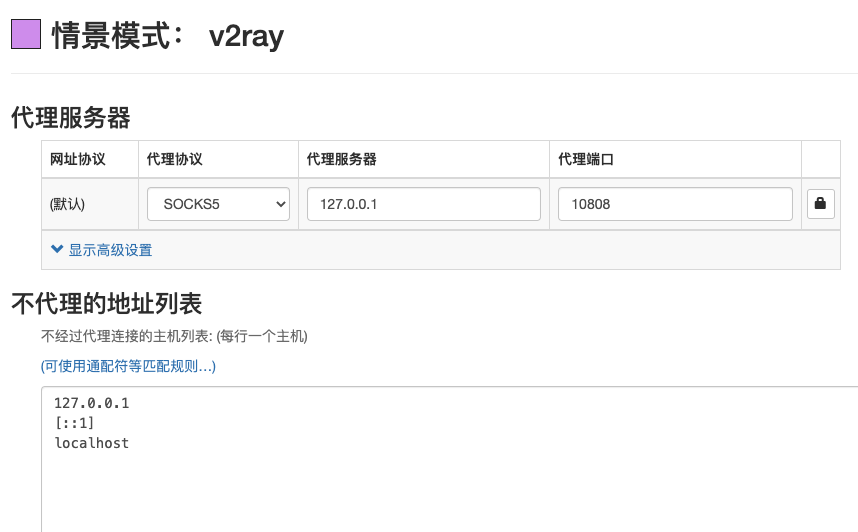
最后,可使用 SwitchyOmega 等切换代理的插件将浏览器流量转发至 5055 端口,即可实现科学上网。
Conclusion
通过 websocket 协议走443端口伪造网页请求如图所示:
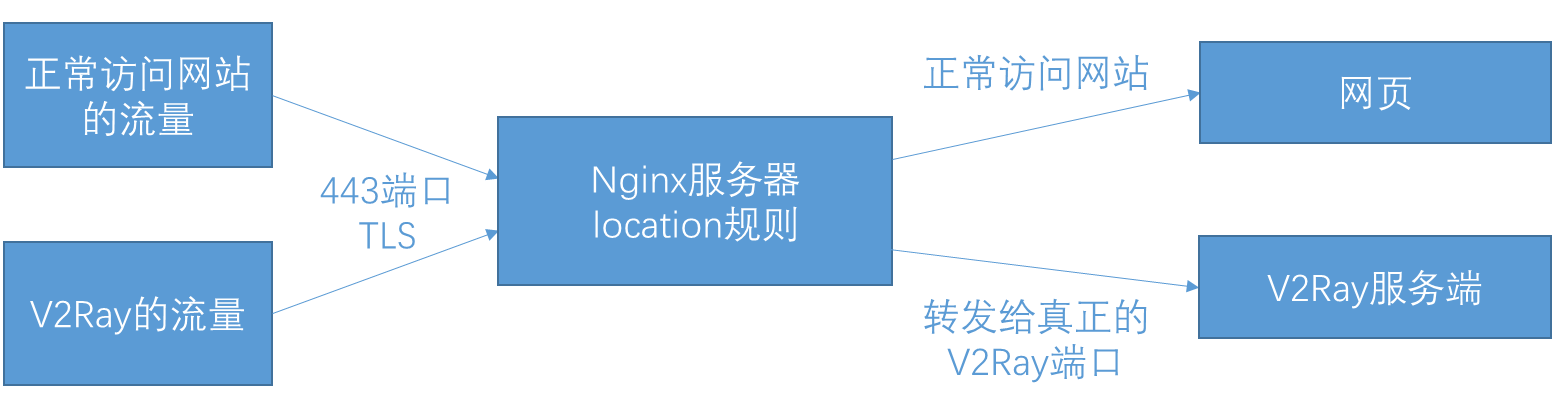
以该文的配置为例,请求链路如下:
浏览器输入网址 ⬇️ SwitchyOmega 代理至本地 10808 端口 ⬇️ 本机 V2Ray 监听 10808 端口 ⬇️ 将流量通过 VMESS 和 WebSocket 协议请求 example.com/v2ray ⬇️ Nginx 反向代理到 5055 端口 ⬇️ 服务端 V2Ray 验证 id 和 alterId ⬇️ 转发请求
另外,还可通过 CDN 加速拯救被ban ip,但可能会降低速度。
v2ray · nginx