Docker Learning Notes
Introduction:
- Series of Docker Learning Notes are based on:
OS:Ubuntu 16.04 LTS
Java version:Jdk 1.8
What is Docker?
- Docker’s idea comes from cargo containers. What problem can cargo containers solve? For example, goods can be put in order on a large ship and all kinds of goods are standardized by containers, containers and containers do not interact with each other so that we don’t need a special fruit ship or a chemical carrier. As long as these goods are properly packaged in containers, we can transport them with one large ship. Docker is a similar idea like this. Cloud computing is now very popular, and cloud computing is like a big cargo ship while docker is a container.
1> Different applications may have different application environments, for example, dependencies for websites developed by .Net and by PHP are not the same. If install their dependencies on one server, debugging will take a long time and dependencies might be conflict to each other. For example, IIS and Apache access port conflicts. At this point, you have to isolate the website developed by .Net and the website developed by PHP. Traditionally, we can create different virtual machines on the server and put different applications on different virtual machines, but the cost of virtual machines is relatively high. Docker can realize the function of virtual machine isolation application environment, and it costs less than virtual machine.
2> When you develop the software on Ubuntu, but the operation and maintenance management is on CentOS, the operation and maintenance of your software from the development environment to the production environment will encounter some Ubuntu to CentOS problems, such as: a special version of the database only supported on Ubuntu but not on CentOS, so that you have to solve such problems during the process of transfer between operations. But if you use docker, you can directly transfer the development environment to operation and deploy by docker directly and faster than regular deployment.
3> On the server load, if you use virtual machines instead of docker, free memory will not be used.
Life cycle of docker:(image, container, registry)
1.docker image
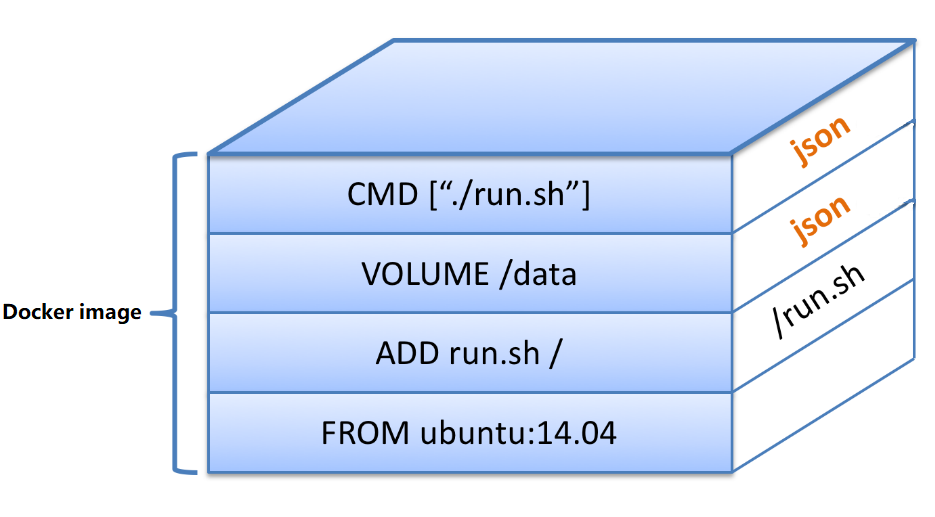
- Docker image is actually made up of a file system, which is called UnionFS. At the bottom of the Docker image is bootfs. This layer is the same as our typical Linux/Unix system, including boot loader and kernel. When the boot is loaded, the kernel is all in memory. At this point, the right to use memory is transferred from bootfs to the kernel, and the system will also unload bootfs. The first layer of Docker on bootfs is rootfs (root file system). Rootfs is the distribution of different operating systems, such as Ubuntu, Centos and so on.
2.docker container
docker runInstantiate an image to a container, similar to “new” in java.- Some parameters for
docker run:
-d: Run container in background
-e: Set environment variables
-p: Host port:Container port
--name: Set name for container
3.docker registry
- A place to store and share docker images.
eg., Docker Hub: hub.docker.com
Deploying a web application with docker
1.pull source code to host
Subversion: svn checkout svn://svn_address [host_volume]
Git:git clone [.git file]
2.Packaging .jar/.war file through Maven/ANT/Other
mvn package / ant makewar / etc.
3.Write a Dockerfile
FROM [imageName:tag]
MAINTAINER [author] [contact_e-mail]
ADD [.jar file] [volume_in_docker_container]
RUN bash -c 'touch /opt/xxx.jar'
#Change timezone
RUN echo "Asia/Shanghai" > /etc/timezone && dpkg-reconfigure -f noninteractive tzdata
#expose default port [8080_for_tomcat]
EXPOSE 8080
#execute .war/.jar file
CMD ["catalina.sh","run"]       --for xxx.war
CMD ["java","-jar","/opt/xxx.jar"]   --for xxx.jar
4.Docker build
docker build -t [imageName] .
DO NOT FORGET the.at the back.
5.Docker run
docker run -d -p [port]:[port in container]
Other commands for docker
sudo docker ps -a : List all containers
sudo docker images : List all images
sudo docker images|grep test|awk '{print $3 }'|xargs sudo docker rmi : remove all images that contain ‘test’
Installation
Before Installing docker, we have to install and configure necessary environments.
Configure Java environment
-
Jdk Download link:
http://www.oracle.com/technetwork/java/javase/downloads/jdk8-downloads-2133151.html -
Install Jdk
sudo mkdir /opt/java
sudo mv jdk-8u162-linux-x64.tar.gz /opt/java
cd /opt/java/
sudo tar -zxvf *
sudo rm *.tar.gz- Configure environment variables:
sudo vim ~/.bashrc - Add JAVA_HOME, PATH and CLASSPATH for Jdk:
export JAVA_HOME=/opt/java/jdk1.8.0_162
export PATH=$PATH:$JAVA_HOME/bin
export CLASSPATH=.:$JAVA_HOME/lib/dt.jar:$JAVA_HOME/lib/tools.jar- Remenber to source the configuration file!
sudo source ~/.bashrc
Configure Maven Environment
- Maven Download link:
https://maven.apache.org/download.cgi - Install Maven
sudo mkdir /opt/maven
sudo mv apache-maven3.5.2.tar.gz /opt/maven
cd /opt/maven
sudo tar -zxvf *
sudo rm *.tar.gz- Configure environment variables:
sudo vim etc/profile - Add M2_HOME, PATH and CLASSPATH for Maven:
export M2_HOME=/opt/maven/apache-maven-3.5.2
export PATH=$PATH:$M2_HOME/bin
export CLASSPATH=$CLASSPATH:$M2_HOME/lib-
Remenber to source the configuration file:
sudo source etc/profile -
Check version for Java and Maven:
java- version
mvn -v
Install and configure Docker
- Install docker with apt
sudo apt-get update
sudo apt-get install docker.io- In China, the speed of downloading docker image from official library is slow,so I configured a daocloud accelerator for docker:
sudo curl -sSL https://get.daocloud.io/daotools/set_mirror.sh | sh -s http://ff626ecd.m.daocloud.io
sudo systemctl restart docker.service- Check docker version:
docker --version
Integration with Jenkins
Why choose Jenkins?
Jenkins is an extensible continuous integration engine, mainly used in build / test software projects continuously and automatically and monitoring some of the tasks that are executed on time. So it can ensure developers and related personnel save time and effort to improve development efficiency.
Install Jenkins
- Download and install Jenkins
wget -q -O - https://pkg.jenkins.io/debian/jenkins-ci.org.key | sudo apt-key add -
sudo sh -c 'echo deb http://pkg.jenkins.io/debian-stable binary/ > /etc/apt/sources.list.d/jenkins.list'
sudo apt-get update
sudo apt-get install jenkins- Visit localhost:8080 for Jenkins home page
Initial password for admin:
vim /var/lib/jenkins/secrets/initialAdminPassword
SSL Configuration
Differences between Http and Https
● The HyperText Transfer Protocol (HTTP) protocol is used to transmit information between the Web browser and the web server. The HTTP protocol sends content in plaintext, and does not provide any way of data encryption. If an attacker intercepts the transmission message between the Web browser and the web server, the information can be read directly. Therefore, HTTP protocol is not suitable for transmitting some sensitive information, such as credit card number, password and other payment information.
● In order to solve this defect of the HTTP protocol, it is necessary to use another protocol: Hypertext Transfer Protocol Secure (HTTPS). In order to secure data transmission, HTTPS adds SSL protocol on the basis of HTTP. SSL relies on certificates to verify the identity of the server and encrypts the communication between the browser and the server.
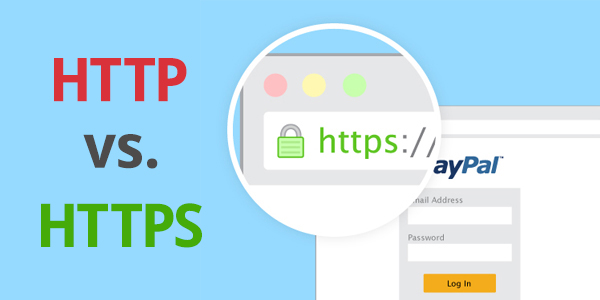
● The data transmitted by the HTTP protocol are not encrypted, that is, plaintext, so it is very unsafe to use the HTTP protocol to transmit privacy information. In order to ensure the encryption and transmission of these privacy data, the Netscape Co designed the SSL (Secure Sockets Layer) protocol to encrypt the data transmitted by the HTTP protocol—HTTPS. To put it simply, the HTTPS protocol is a network protocol constructed by SSL+HTTP protocol, which is capable of encrypting transmission and identity authentication,so it’s more secure than HTTP protocol.
Apply for a SSL certificate
● There are several ways to apply a SSL certificate, and I chose TrustAsia SSL certificate.The process of application will not be detailed.
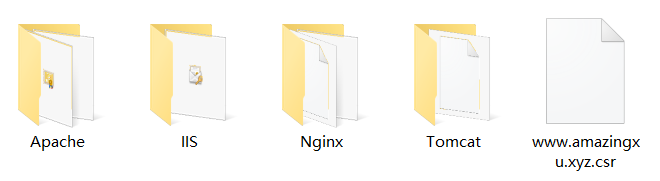
Below are the certificates for Apache, IIS, Nginx and Tomcat:
Configure SSL for Spring Boot project
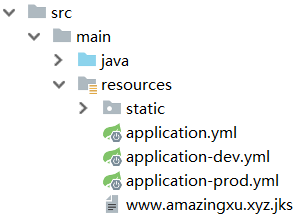
● Put the certificate( .jks file in tomcat folder) in the project at the application.yml level directory.
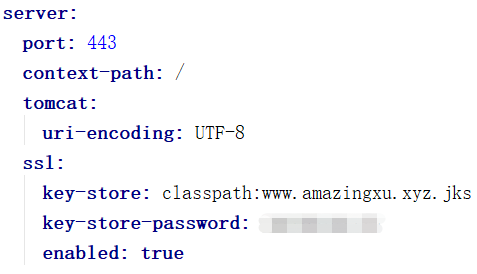
 ● Add configurations for ssl in applcation.yml( or application.properties)
● Add http redirect in the Spring Boot application file
@Bean
public EmbeddedServletContainerFactory servletContainer(){
    TomcatEmbeddedServletContainerFactory tomcat=new TomcatEmbeddedServletContainerFactory(){
        @Override
        protected void postProcessContext(Context context) {
            SecurityConstraint securityConstraint=new SecurityConstraint();
            securityConstraint.setUserConstraint("CONFIDENTIAL");//confidential
            SecurityCollection collection=new SecurityCollection();
            collection.addPattern("/*");
            securityConstraint.addCollection(collection);
            context.addConstraint(securityConstraint);
        }
    };
    tomcat.addAdditionalTomcatConnectors(httpConnector());
    return tomcat;
}

@Bean
public Connector httpConnector() {
    Connector connector = new Connector("org.apache.coyote.http11.Http11NioProtocol");
    connector.setScheme("http");
    // The port number of the HTTP that Connector monitors
    connector.setPort(80);
    connector.setSecure(false);
    // Redirect port after monitoring HTTP port
    connector.setRedirectPort(443);
    return connector;
}
Add ‘Post Steps’-‘Execute shell’ in Jenkins
cd /var/lib/jenkins/jobs/wxblog
sudo docker build -t wxblog:$BUILD_NUMBER .
sudo docker ps -a | grep wxblog | awk '{print $1}' | xargs sudo docker rm -f
sudo docker run -d -p 80:80 -p 443:443 --name wxblog_$BUILD_NUMBER wxblog:$BUILD_NUMBER
sudo docker images|grep wxblog|awk '{print $3 }'|xargs sudo docker rmi
● DON’T FORGET to run both ports: -p 80:80 -p 443:443.
● Congratulation! When you visit http://www.amazingxu.xyz , the website will redirect to https://www.amazingxu.xyz with a secure mark beside your address bar : )
docker